School Projects
It is difficult to make all classroom mathematics interesting,
but if the subject is related to a Project in the school,
it would help children to see the relevance and importance
of mathematics in everyday life.
Project B: A Weather Station

Children can gain a great deal of mathematical knowledge by helping to observe and record the weather. With this in mind, pupils can be encouraged to run their own school weather station. Set up your weather station fairly near the school as it is not too pleasant walking to the other side of the football field in the pouring rain.
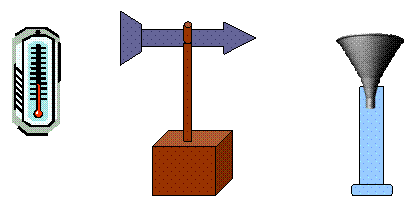
The following instruments are necessary:
- a thermometer
- a rain gauge
- a weather vane
The thermometer
A thermometer measures temperature. Temperature is measured in degrees Celsius (°C).
A thermometer is simply a thin tube of glass containing a liquid (alcohol or mercury) which expands or contracts when the temperature gets hotter or cooler.
The tube is graduated to give readings in degrees Celsius (°C).
The rain gauge
A rain gauge is a simple instrument which collects the rain as it falls and channels it into a calibrated flask. The rainfall is measured in millimetres and centimetres.
The weather vane
A weather vane shows the direction from which the wind is blowing. It is basically an arrow on a pivot. The wind blows against the "vane" on the arrow which points to the
direction to where the wind is blowing. The wind is naturally blowing from the opposite direction.
- Measuring the weather
Taking the measurements (or readings) of the weather should be done at a specific time in the day. Most schools find that the most convenient time is before lessons start in the morning or at mid-morning break. It is best to organise the children into small groups (3-4 children). Each group is responsible for taking the readings for a whole week. - Recording the weather
The temperature, rainfall and wind direction can be noted down in a recording notebook and then transferred into pictorial form later.
The appendix to this Resource Unit contains photocopying graphs for this purpose. - Measuring cloud cover
Pupils can be taught to look at the sky and estimate the amount of cloud cover.

Project A: Planting a forest

To start your tree planting project you will need 25 seedlings. A good species of a quick growing tree is called Blue Gum (Eucalyptus grandis). This tree will reach a height of 30 - 35 metres in eight years (in Africa), and will reach a height of 100 metres if left for 30 years or more. It is recommended that these trees are harvested in eight years, by which time they should earn enough money for the school to afford a computer, or the timber for a new classroom.
The Blue Gum has many uses, including, furniture, pit props, doors, roofs and paper pulp. You may choose to use your harvested timber for building purposes in your own school. In this way you will save money.
1. Marking out your area
Look around your school for a suitable site for your trees. The site should be at least 30 metres away from water in the form of a stream or river.
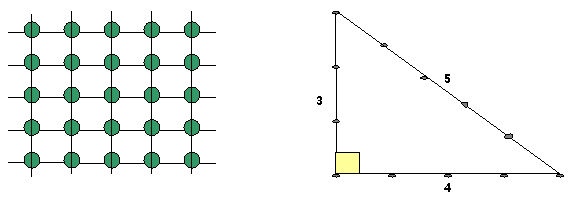
It should also be 20 metres away from buildings, power lines and indigenous bush. Make a grid by scratching straight, parallel lines on the ground. Each parallel line is 2·7m apart.

You will want your trees to be squared so you must have a right-angle in each corner. This can be achieved by using a right-angled triangle with sides 3, 4 and 5 units long. This is how the Egyptians made accurate corners on the pyramids. We use the same method for the corners of football fields.
2. Preparing holes for the seedlings
At each intersection we prepare holes or pits for planting. You need 25 holes. Try to get the whole class involved so that each pupil is responsible for a hole.
Let them feel pride in planting their own tree.
Holes are 50 cm wide and 25 cm deep. Break up the soil in the hole and get rid of stones. Shape the hole to form a basin.
3. Planting the seedlings
Pour two litres of water into the hole before planting. Plant tree with the root collar about 3 cm under the soil. The roots should be positioned vertically and not bent.
After covering with soil, pout two litres of water onto the soil and make firm leaving no air pockets. Place mulch over the soil to prevent drying up.

Fertilizer should be given within one week of planting. Use 50 g of 2:3:2: (22) about 15 cm from the plant, under the soil.
Water your trees when it is very dry, hot or windy. Four litres of water should be enough for each seedling. No watering should be necessary once the tree is two months old.
4. Square numbers
You now have your own square number demonstration area: 2 x 2 = 4; 3 x 3 = 9; 4 x 4 = 16; 5 x 5 = 25.
A well planted tree will grow fast and will require very little tending. After eight years a stand of beautiful gum trees will be the pride and joy of your school. Remember that this timber has a great value and can be sold to purchase necessary items to improve the education of your pupils and the education of all the community.
Project C: Keeping chickens

Keeping poultry is another educational project which will make a financial profit for the school, and will show children that mathematics is used in the business world. Start the project with a few chickens and a cockerel, and then use the fertilized eggs for adding to the flock.
Chickens are probably the most common homestead animal in the world. They are ideal for keeping in schools because they require little space and can be housed and bought at a reasonable cost. They also provide us with meat and eggs. Much meaningful mathematics can be learned by housing and keeping chickens. Pupils who normally find mathematics difficult will become interested in the practical mathematics necessary for successful poultry keeping.
This Project looks at some of the ordinary mathematics which will evolve from keeping chickens in your school.
1. Making a chicken hut
Chickens can live in a variety of huts. However, a chicken hut must be big enough, warm and dry. It is suggested that schools build their own chicken hut by modifying the traditional hut.

Looking at the area and perimeter of a hut.
Our forefathers knew more about mathematics than we do. They discovered that if they built a round hut they could get more space than if they built a square or rectangular hut.
Measuring out your chicken hut
The method used for measuring out traditional, circular huts varies from country to country:
Stick and string method
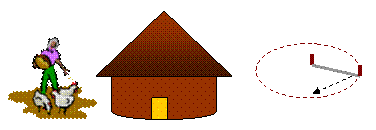
One method of marking out a circular hut is by using two sticks and a piece of string. One stick is knocked into the ground. The string is attached and makes a
giant pair of compasses to make the circle.
What part of the circle is the straight piece of string?
What part of the circle is marked by the stick?
In parts of Africa, one method was to cut long poles and put them on the ground to form a cross. The circular shape was then marked using the ends of the pole as a guide. What mathematical name could you give to the poles? What angle do the poles make at the intersection? Which part do you think is called the quadrant of the circle?
Dimensions of chicken hut
The second method of marking out your hut will be the easiest. The following dimensions are given as a rough guide. Each school can plan their own measurements.
Dimensions of the hut:
| Diameter | 3m |
| Height of wall | 1,7m |
| Height of apex | 2,5m |
| Door | 1,4 by 0,8m |
| Windows | 50cm by 30cm |
2. Building the wall
Build up the circular wall with vertical posts placed next to each other in a shallow trench. These are strengthened by horizontal lengths of sapling wood.
It helps if there is an occasional vertical pole, say every metre of the circumference, which is given a deeper foundation than the others. All the poles are vertical and parallel.
The hut will be warmer if you now put mud on the outside and inside. Get someone from your local community to show you how. It may be easier to erect the roof if a large pole is
placed in the middle of your circle.
Therefore, the foundation of your roof will be a number of triangles. Children will have the experience of handling angles in real life and measuring them. Get an experienced parent to help the children with this part of the building.
3. Broiler financial record
| Returns | Costs |
| Sale of chicken | Cost of 30 broilers |
| Sale of eggs | Cost of 2 bags of mash |
| Total returns | Total costs |
Make a financial record like the one shown above. Enter your costs. When you sell your birds enter your returns on your financial record. When you have sold all your birds, add up all your returns and work out the total. Work out the total costs. Place these amounts on the table shown. Take the costs from the returns. Look to see whether you have made a profit or a loss on your chicken project.
There are two ways of feeding broilers. Some people say the birds should have food at all times. Other people say that the birds should be fed a measured amount. You will have to decide or you can try both methods as an experiment.
4. Weighing your chickens
When your birds first arrive, weigh them. Weigh several birds together in a bucket or basket. Divide the weight by the number of chickens weighed together to get the average weight.
Record the weights in a chart.
5. Space for your chickens
You will have to find out the area of the floor in your chicken hut. Each chicken will need a certain amount of space and will determine how many chickens you can keep.
Use the following numbers:
Broilers: 5 birds per metre square
Laying hens: 3 birds per metre square
6. Feeders and drinkers
The size of your feeders and drinkers will depend on:
- the age of the birds
- the number of birds
- the type of feeder or drinker.
These can be made of old tins.
 |
 |
 |